How to Setup a Facebook Campaign
This blog covers how to setup your Facebook ad campaign at the campaign level, including naming conventions, budgeting strategies, audience segmentation, and settings for Advantage+ and custom audiences to ensure optimal ad performance and scalability.
Let's set up your campaign level settings for your Facebook ad campaign.

Open your Facebook ad campaign and we're starting at the campaign level.
We're going to move through each of these modules one by one until we're finished with the campaign level settings.

First things first, campaign name.
I recommend at this stage selecting a combination of your product and your promotion.
If you're going to promote skirts in this campaign or all products in this campaign, name the products that you're promoting, and any promotional offers that you have.
For example, 20% off your first order.
This is going to create a unique efficiency expectation for your campaign.

Under campaign details, I recommend leaving this as it is.
You don't need to change the buying type from auction to reservation.
For the campaign objective, you would have already selected this at the start of building our campaign.
And as for spending limit, If you have an idea in our mind how much you want to spend on this marketing initiative, you can set that here or you can link this blank.
It's totally up to you.

Under Advantage+ Catalog ads, you'll want to leave this toggled off.
This doesn't mean that we can't launch Advantage+ Catalog ads, but when you toggle this on, those are the only types of ads that you can launch.
If you want to launch image ads, video ads, carousel ads, collection ads, any other types of ad format, you won't be able to if we toggle on Advantage+ catalog ads.

For budget, I recommend using campaign budget.
This distributes our budget across your ad sets to maximize results.
It puts your ad sets into competition so that they are competing around your objective sales. And whichever ad set is most effective at doing that, will get your spend automatically allocated to it.
In a nutshell, your ad spend is going to be spent smartly.
Then you need to set your budget.
You can either set a daily budget or a lifetime budget.
I recommend leaving this at a daily budget.
How much should your daily budget be for Facebook ads?
The rule of thumb is to use your of acquisition x 7.
If it normally costs you $10 to find a new customer, $70 would be the minimum daily budget.
If it normally costs you $20, $140 would be the minimum daily budget.
I recommend setting your daily budget between $200 and $300. But if that seems like too much to you, you can start lower, that just means that you'll be going a little bit slower.

Under campaign bid strategy, we can change this from highest volume or value to something like a cost per result goal.
I recommend this if you have an idea in our mind for what you're willing to pay to acquire a new customer or a purchase from your ads and a ROAS goal, if you know how many dollars you need in exchange for every one dollar of ad spend.
A good rule of thumb is, if you know your gross margin, do 100 divided by your gross margin, and that is the lowest your ROAS can go.
If you're just getting started, I recommend leaving this at highest volume or value, and later down the line, you can use more complicated and complex expert tools like cost per result goal and ROAS score.
These might improve your performance in the long run, but right at the start of your advertising journey, these might stifle results, because your campaign does not have enough data to accurately know when it can achieve your cost per result goal, and you'll likely not spend anything at all.
For budget scheduling. I recommend leaving this blank.
Run ads all the time, you don't need to run ads at different times, unless there's a very specific marketing initiative, and then you can change this up.

Under AB test,I recommend leaving this as is.
If you have an Advantage+ budget on, you're already AB testing all of the time.

The last part of the campaign level setup is also the most complicated part, audience segment reporting.
You only have to do this once, so I'm going to walk you though it so that you have this setup for every campaign that you build in the future.

Under engaged audience, click edit in advertising settings. This will open a new tab with the advertising settings page from your Meta Business Manager.

Click create custom audience and then use your website as the source.

Click next and make sure you select the right pixel, that we're selecting all website visitors and that we use the maximum retention period.
That's 180 days.

Then define this audience. For example, "All website visitors. 180 days."
Click create audience and then that audience will populate under your engaged audience.
These are people who are aware of your business or interactive with your products or services, but have not yet made a purchase.
You definitely don't want to include your previous purchases, your customer list here.
That is for the next section underneath the existing customers, match list.

Click create a custom audience.

Then website.
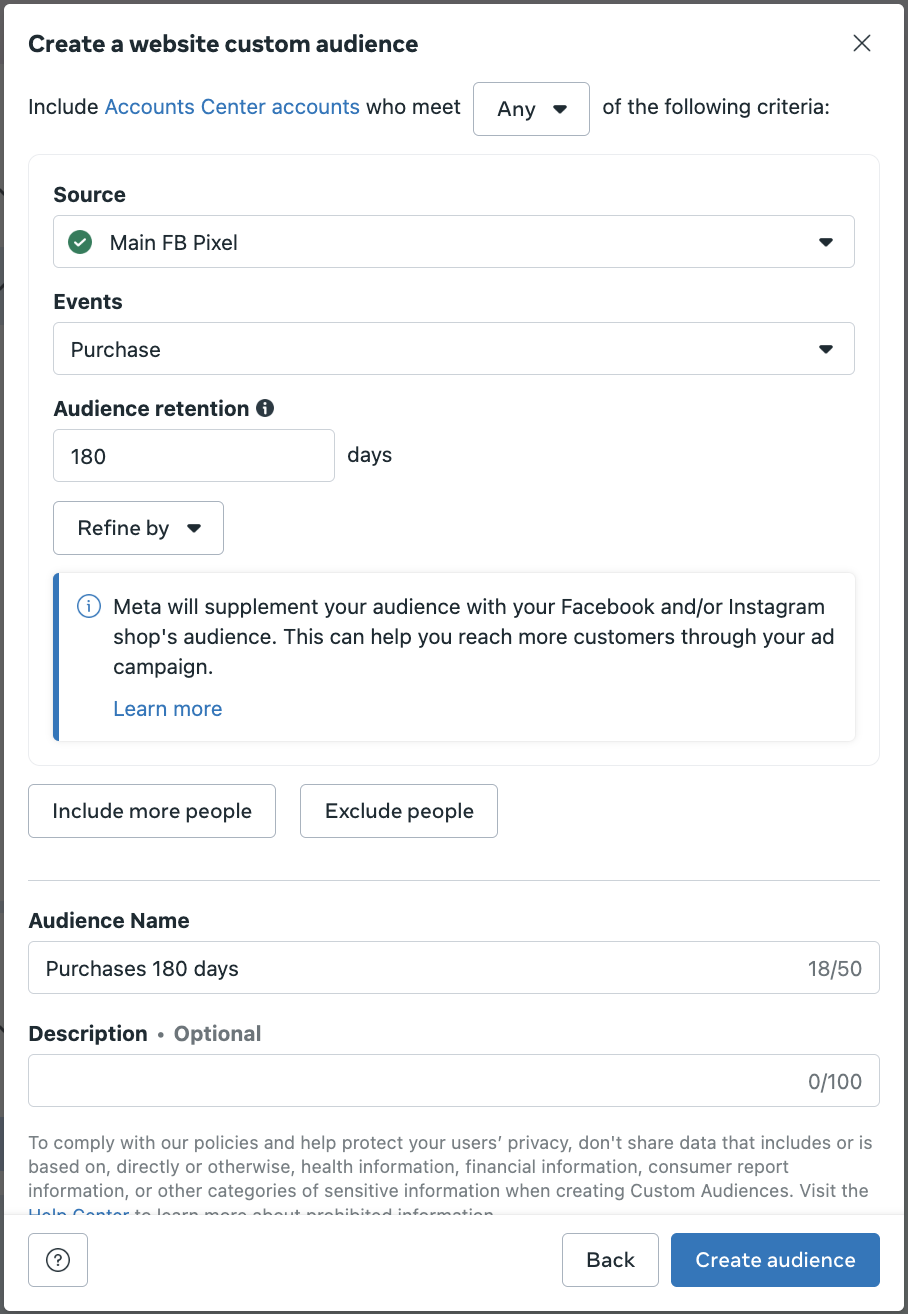
Click next and change the event in this drop down to purchase. Because your previous customers are the people who have made a purchase in the past.
Under audience retention, the maximum audience retention time frame is 180 days.
Then define your audience name. For example, "Purchases 180 days" and click create audience.
The next thing you want to do is add in purchases from your catalog or your shopping apps as well.
That's Facebook Shops and Instagram Shops.

Click create a custom audience again and this time, select Shopping.

Using Facebook Page as the Platform, select your Facebook Page.
Select accounts center, accounts who purchased any products and add 180 days for the audience retention.
It's important to make sure you select the correct Facebook Page in this step.
If you have access to multiple pages, you might see the wrong page populate.
Once you have double checked that you have the right Facebook page, define that audience name and click create audience.
Then do the same thing for Instagram. You'll need to make sure you change that your Instagram account is a professional account.
The one last one that you should set up is your catalog.

Click catalog, then next.

Select people who purchased products from your products set and the audience retention to 180 days.
Define your audience name and then click Create Audience.
That is how to set up your audience segments in your advertising settings.
Going back to the Facebook campaign, you can check off the rest of the list of our campaign level settings.

For special ad categories, there are only a few times where you want to use this.
If you are in special ad categories relating to financial products and services, employment, housing, social issues, elections or politics.
If you are in these niches, you will need to select which category you're in. It is important that you declare this or your account might get banned.
If you're just an e-commerce store, then don't worry about this, click the next button and move on to the ad set level settings.
And that is how to set up the campaign level settings for your Facebook ad campaign.
